- Home
- Smoker Recipes
- Beer Can Chicken
Beer Can Chicken on the Smoker
Beer Can Chicken, or better known as "beer butt chicken" is one of my favorite smoked foods. It's fun to prepare, easy to cook, and comical to serve. And every time I cook them, they always turn out perfect.
If you like rotisserie chicken, but want a smoke and beer flavor to compliment the chicken, this is the absolute way to go. This is my own recipe and winged it the first time I smoked it. It was awesome and now something I do at least twice a year.
I smoked the whole chickens (I usually cook two at a time) in my Masterbuilt Electric Smoker, so the cooking time and temperature may vary if you are using a different type of smoker. But for the most part, it should turn out perfect as long as you follow this recipe.
Unlike grilled chicken, the smoked beer can chicken cooks at a much lower temperature, thus doesn't boil the beer in the can. But it still gets hot, creating a light steam along with the gentle smoke to deeply marinate and moisten the chicken while it slowly roasts.
Another great benefit with cooking your chicken in the smoker is that you don't have to rotate it around. Once you set it in the smoker, it stays where it is until it is done. Just be careful removing it from the smoker as the contents of the beer can are extremely hot, along with the whole chicken.
I will be trying this recipe in an offset smoker next and will let you know any differences.
Apple Smoked Beer Can Chicken
Ingredients:
One (1) Whole Chicken (double the recipe for 2)
Two (2) Twelve Ounce Cans of Beer (Cheap Beer Works the Best)
Two (2) Tablespoons Chopped Onions
Two (2) Tablespoons Apple Cider Vinegar
Three (3) Cloves of Garlic (or pre made minced garlic)
One (1) Tablespoon of Olive Oil
One (1) Packet of McCormick's Grill Mates Zesty Herb Marinade
One (1) Bag of Apple Wood Chips (or any fruity wood)
Preparations
(Optional) The night before cooking, thaw the whole chicken. Carefully wash and trim the chicken, making sure the butt of the chicken is large enough for a can of beer. Place chicken in a large container and soak overnight (flipping it over at least once half way through the soak) in beer for best results.
Preheat the smoker to 260 degrees Fahrenheit with no wood. While the smoker is heating up, crack open the first beer and drink half of it. This is the benefit of being the cook. Pour the remainder of the beer in a plastic microwavable bowl.
With a can opener or good scissors capable of cutting thin metal, cut the top off of the beer can as close to the rim as possible. Carefully fold over the top 1/8th inch of the can where you cut it to strengthen it a little.
Mince three garlic cloves and chop up one onion (small pieces). Add one tablespoon of chopped onions and two minced cloves of garlic into the microwavable plastic container with the beer. Add two tablespoons of Apple Cider Vinegar to the container and stir. Place the container uncovered in the microwave and heat on high for 45 seconds. (This is so the mixture doesn't have to take forever heating up in the smoker; it will already be hot.)
Open a second can of beer and drink half of it. (Yes, if you do more than one chicken, you may start feeling pretty good after this one.) Pour one cup of water and the rest of the beer in your drip pan. Place the rest of the onions and garlic as well as a half a cup of Apple Cider Vinegar in the drip pan as well (optional).
Remove the whole chicken from the soak and place it on a flat surface. Lightly coat it with one tablespoon of olive oil until the entire area of the beer can chicken has a shine to it. Spread one packet of McCormick's Grill Mates Zesty Herb Marinade (dry) evenly over the entire body of the chicken.
Pour the contents of the plastic container from the microwave into the empty beer can that you previously cut open.
CAUTION - Contents may be hot to the touch. Wear proper personal protective equipment (PPE).
Gently shove the beer can up the chicken's butt and carefully place the whole chicken on a smoker rack (not yet in the smoker).
You may need to get a little creative with the drumsticks in order to get the chicken to stand up properly. I use marshmallow sticks (the long wooden ones) and stab the chicken through the thighs for added support for the limp chicken.
Yes, this beer can chicken recipe takes some time to prepare, but it is very much worth it as you will see.
Cooking Instructions
When the smoker reaches 240 degrees, place the drip pan in the smoker. Wait for the smoker to reach 270 and place the beer can chicken in smoker as high in the smoker as it will go. Turn down the temperature controller to 250 degrees Fahrenheit. Fill up the wood chip tray with one handful of Mesquite or Apple smoking chips.
Let the beer can chicken cook for four (4) hours. Thirty (30) minutes after putting the chicken in the smoker, put in more wood chips. Do this every 30 minutes for two hours (half the cooking time). The last time you put wood in the tray is the two hour point. If you want a heavy smoke flavor, you can continue adding wood chips in every 30 minutes for another hour.
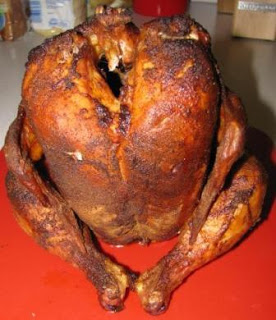
Once the time is up, check the chicken. The skin should be golden brown in color and the meat will be pink and juicy. If you poke it with a fork or toothpick, the juices should flow out of the holes clear in color.
Remove the smoked beer can chicken from the electric smoker and serve.
CAUTION - Remember there is still a beer can full of hot liquid in the chicken's butt. I recommend removing the can with a cooking glove prior to cutting the chicken apart to avoid spilling the hot liquids everywhere.
Nutritional Information
The above recipe easily serves 4 adults, (the below nutritional facts are based on 1 serving).
Calories 246
Calories from Fat 190
Total Fat 12g
Saturated Fat 3g
Cholesterol 78mg
Sodium 350mg
Total Carbohydrates 8g
Dietary Fiber 1g
Sugars 5g
Protein 25g
Check out more smoking recipes like my Beer Can Chicken on the Smoker recipe. Have you tried this recipe? Please let me know what you think or submit a version of your recipe to add to the site.